- Well Built Solutions Newsletter
- Posts
- 🌞🏗 Workday's biggest core upgrade of the year...
🌞🏗 Workday's biggest core upgrade of the year...
Onboarding Plans, demystified.
Mia Eisenhandler
July 16, 2025
Read time: 7 minutes
Hey there! Mia here, with a bold statement:
💥 Onboarding Plans are the most impactful new [core] Workday functionality of the year.
Fully utilized, Workday 2025R1’s Onboarding Plans can transform your organization’s joiner experience… all for the palatable cost of $0 with your existing Workday subscription 😉
Onboarding Plans are Workday’s solution to…
🤝 Bridge the offer-to-start-date time gap
🌎 Manage global onboarding requirements
💼 Handle a million different onboarding needs without mass chaos
♻️ Easily recycle, manage, and track onboarding materials
By the end of today’s newsletter, you’ll know what’s ✨ possible ✨ with Onboarding Plans. And you may just gain the talking points you need to pitch them to leadership.
So, what do these plans look like in practice? Let’s explore!
Workday’s Onboarding Glow-up 💅
Prior to Workday’s first release of 2025, softly put—Onboarding in Workday left much to be desired (as you’ve probably experienced for yourself) 😬
Basically, you had the Onboarding business process, on which you could configure tasks, to-dos, and basic email notifications. From an administrative perspective, managing tasks, documents, policies, and procedures for distinct populations was chaotic at best. Think, endless condition rules and/or several versions of the Onboarding BP…
And from your joiner’s perspective? The experience likely felt disjointed: a handful of inbox tasks, generic Workday-branded emails to decipher, and whatever manual or outside-the-system processes your team set up. Automated touch points between offer acceptance and day one were sparse, impersonal, and easy to miss.
Well, these two 2025R1 features can change all that (🔗 we hyperlinked the Release Notes below, however, we invite you to keep reading and check them out later)…
The New Workday Onboarding Experience (what we’re breaking down in today’s newsletter!)
Workday Docs and Document Generation for the Onboarding Business Process
What does Workday’s “new Onboarding experience” actually entail? It’s essentially…
Onboarding Plans
The Onboarding Planner Hub—where you build and manage your Onboarding Plans!
With Onboarding Plans, you can create thoughtfully curated onboarding content tailored to specific populations. Available to pre-hires on your external career site and to new hires within Workday, this content supports your joiners from the moment they accept their offer through the end of their first year at your company (if desired).
The nuts and bolts of Onboarding Plans 🔩
We recently hired an incredible candidate here at Well Built Solutions—his name is… Donald Duck 🤭 He starts with us next week (we’ve given pre-hires access to Workday to begin completing some of their onboarding tasks ahead of their start date).
When Donald logs into Workday, he sees an “Onboarding Timeline” card:
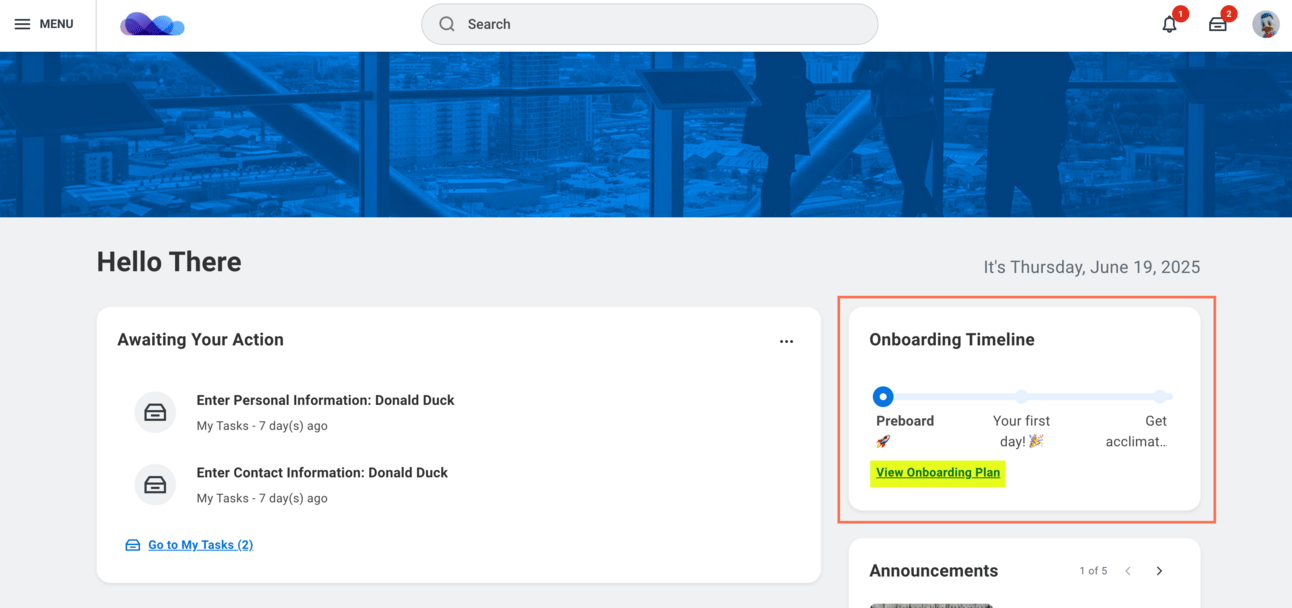
This card automatically displays the joiner’s active Onboarding Plan assignment. From there, they can click “View Onboarding Plan” to see the full scope of what’s ahead.
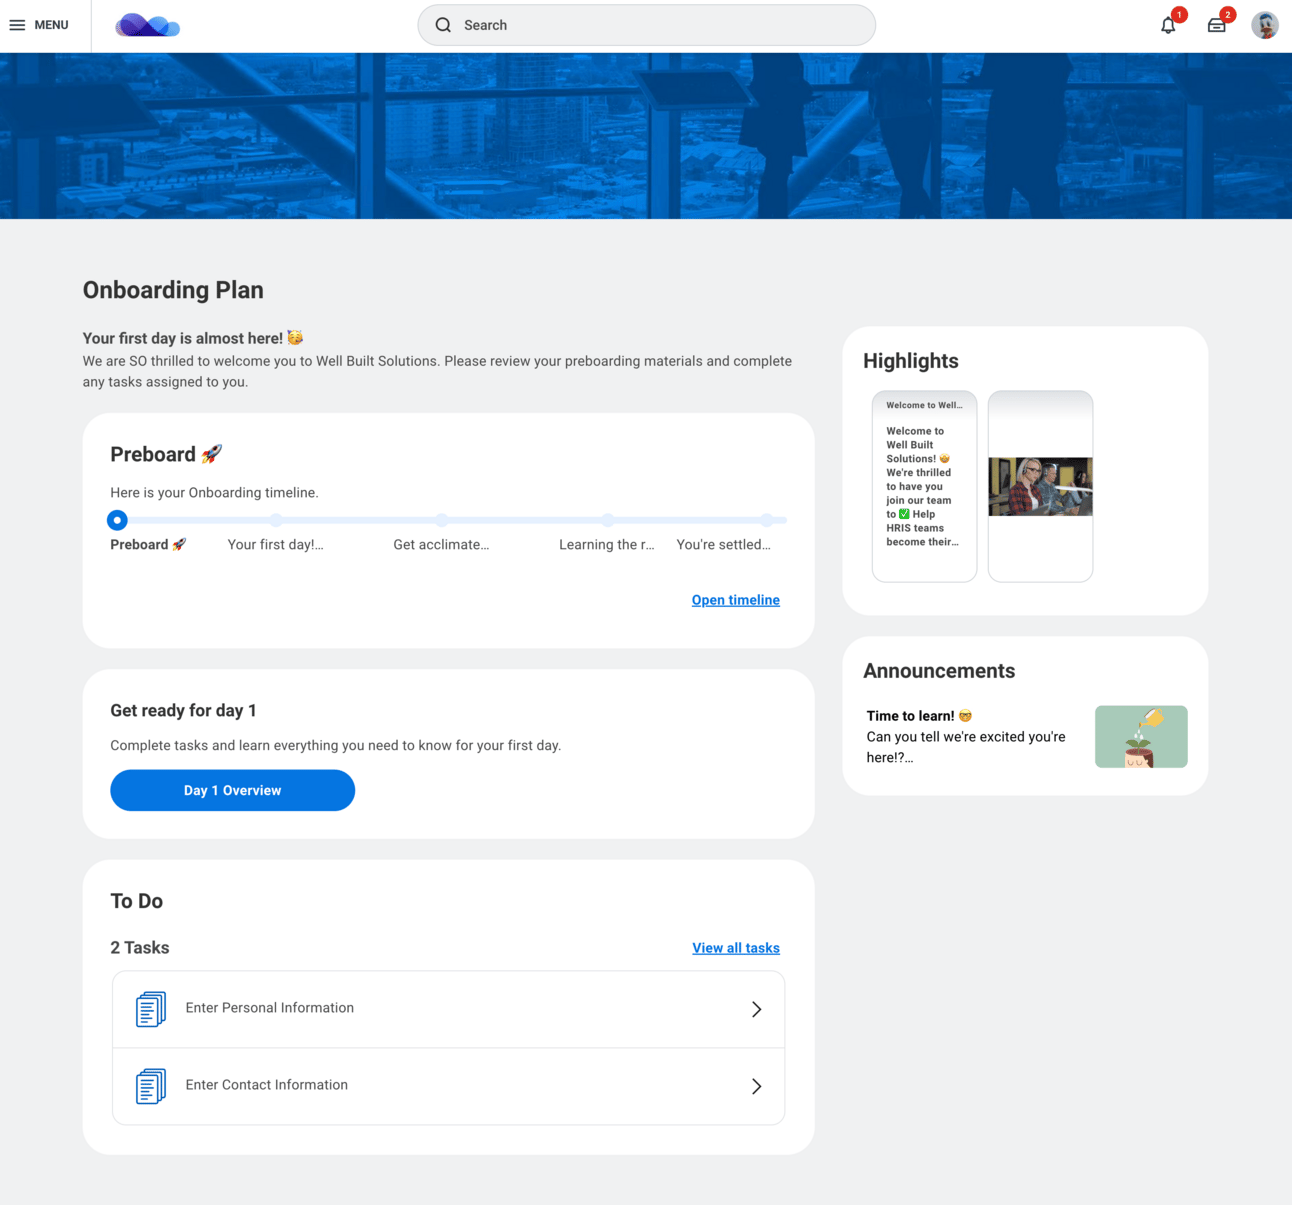
Within their Onboarding Plan, your hire sees every component they’re eligible for (we’ll get into how visibility works soon—hang tight!).
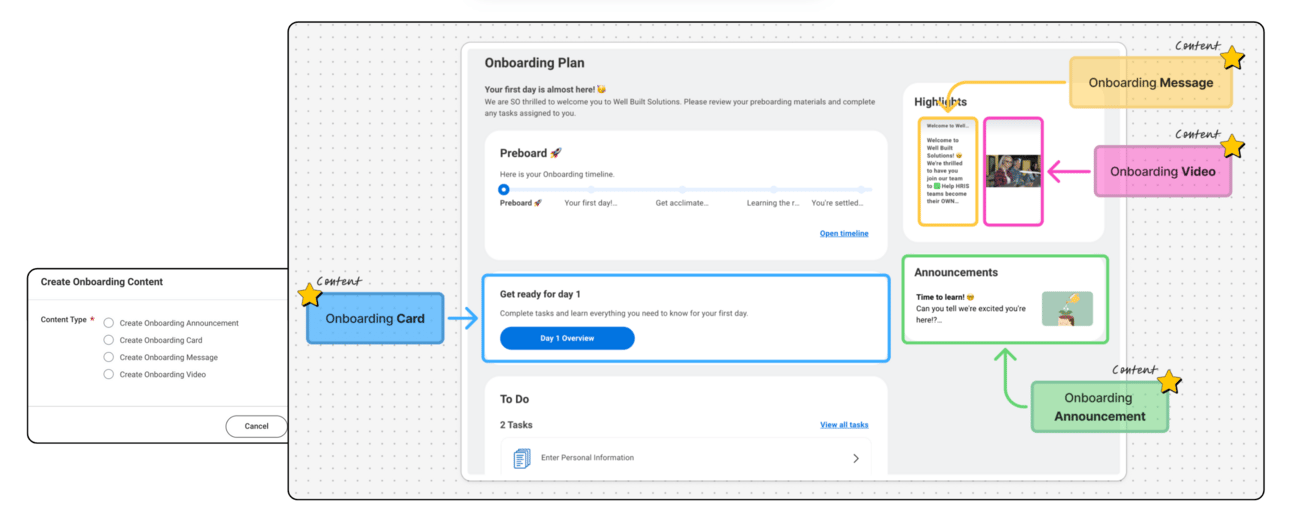
So, what kinds of components show up here?
Check out the diagram below to see what’s possible:
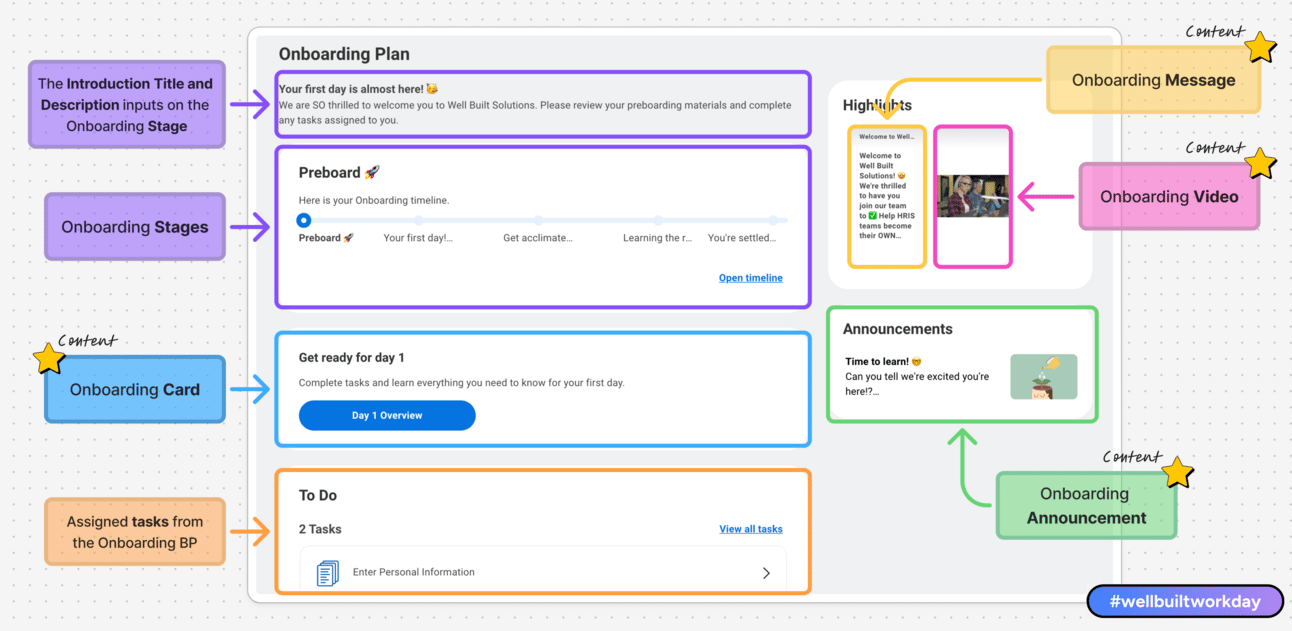
Now… let’s demystify how you can configure all of these components!
The Onboarding Planner Hub ✨
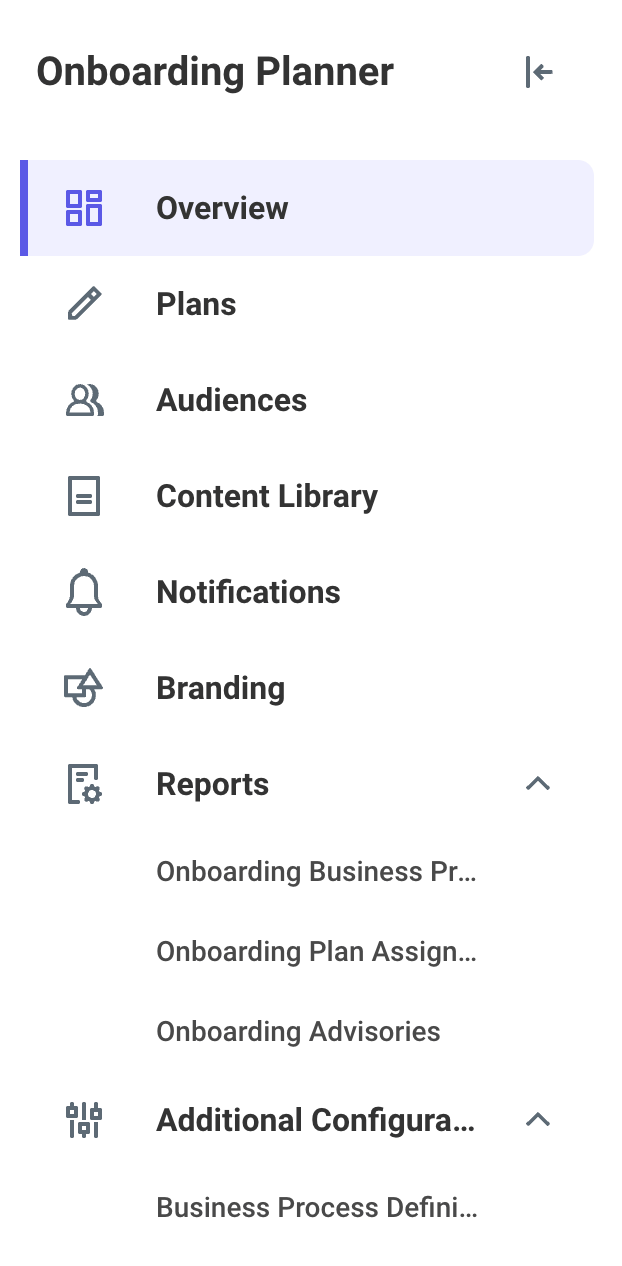
You create, edit, and manage your Onboarding Plans all from Workday’s sparkly new Onboarding Planner Hub…
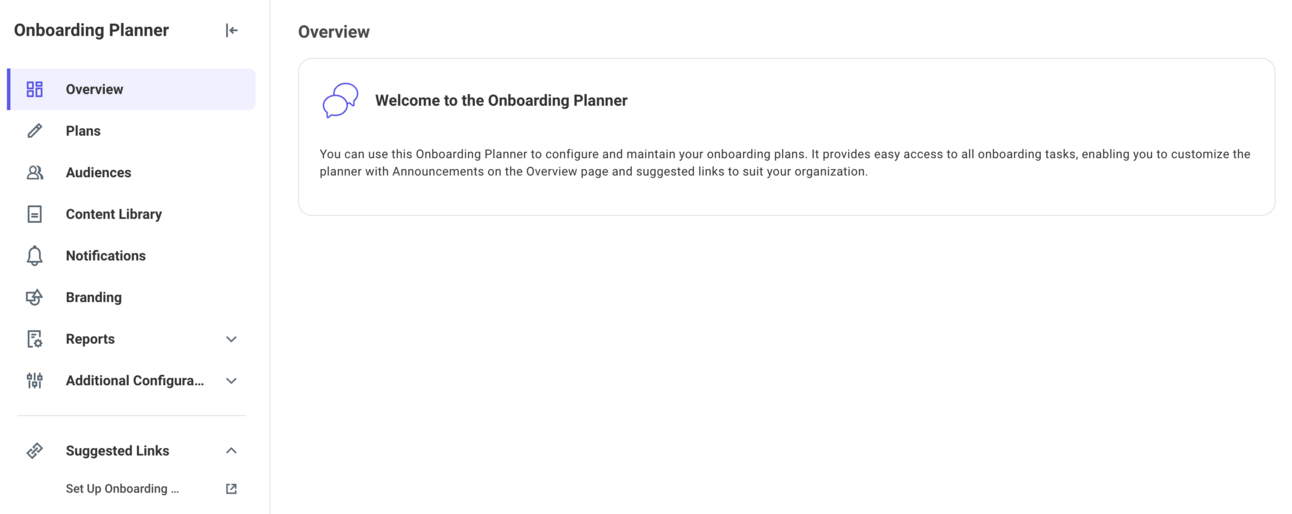
The Onboarding Planner Hub is your workspace for all things Onboarding Plans!
You can access the Onboarding Planner Hub from global search, or, you can add it to your shortcuts.
We love a hub here at Well Built. Not only do they centralize your configuration tasks for a specific area (in this case, Onboarding Plans), but they’re also fully configurable themselves…
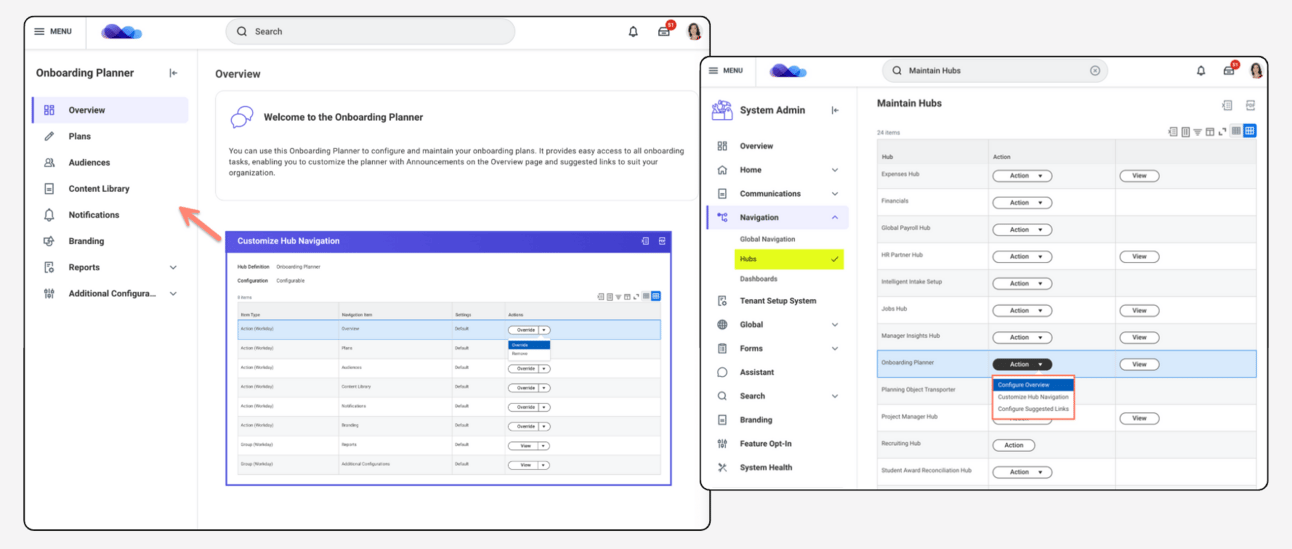
Use the task “Maintain Hubs” to customize your Onboarding Planner Hub (or any hub for that matter).
Poke around the panels within the Onboarding Planner Hub to become familiar with the different components that make up an Onboarding Plan:
Each tab in the Onboarding Hub covers exactly what it’s named. Isn’t it nice how there’s no mystery?
And now… let’s configure! 🤩
🛠️ How to set up an Onboarding Plan…
1. Create an Audience
Before you create an Onboarding Plan, let’s orient you to Audiences.
An “Audience” is a defined population of joiners eligible for a particular Onboarding Plan. Think: Audience = eligibility. It’s how you segment your population to determine who gets which Onboarding Plan and what content.
You build Audiences using condition rules with Workday boolean logic. Use job application condition rules for pre-hires, worker condition rules for new hires, or mix both to target exactly who you need. For example, you could create Audiences that isolate new hires on a specific team, pre-hires located in EMEA, or incoming managers who’ll have direct reports.
Audiences are reusable across Onboarding Plans, and you can create as many as you’d like.
To maintain your audiences, you can use the task—you guessed it 😆—”Maintain Audiences” within the Audiences panel in your hub…
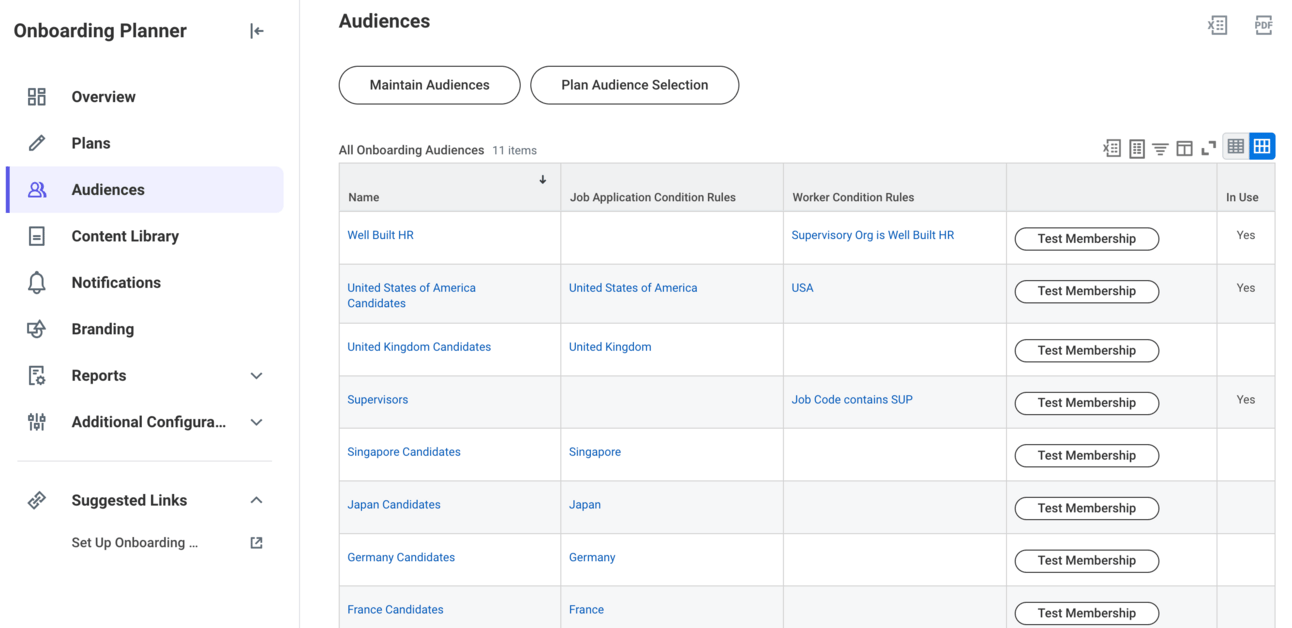
You can have up to 2 condition rules per Audience: one to define the pre-hire population (job application condition rule), one to define the new hire population (worker condition rule), or both.
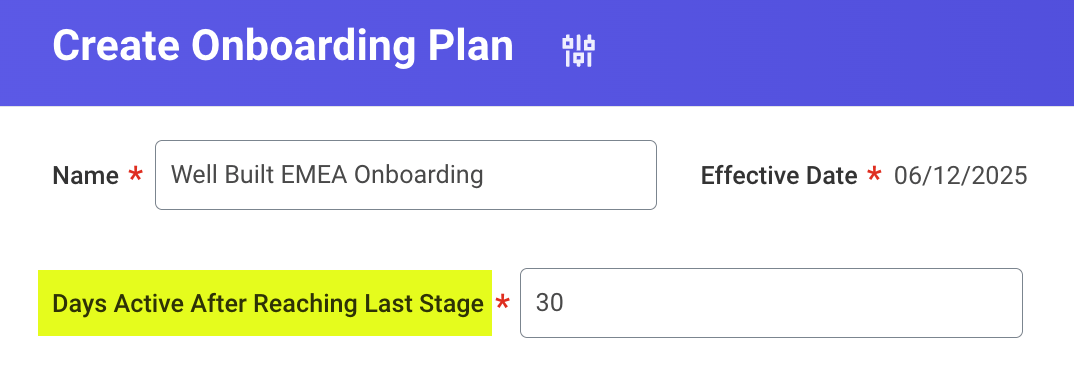
2. Create an Onboarding Plan
After your Audience is created, you can create your first Onboarding Plan. Click the “Create Plan” button on the Plans panel within your hub…

Aside from the plan’s name, there’s just one input to set on the overall plan: “Days Active After Reaching Last Stage”.
This input determines how long the Onboarding Plan remains on your joiner’s homepage after they enter the last stage of the plan. You can set this up to 365 days—meaning your employee can access their Onboarding Plan through the end of their first year!
Within each Onboarding Plan, you can configure up to 10 Onboarding Stages.
Stages hold your content and make up the timeline your joiners follow (recall Donald Duck’s timeline, below).
The timeline helps your joiners feel that satisfying sense of progress! 😊
Each stage represents a distinct period of onboarding that your joiners move through after accepting their offer.
When they enter each stage is determined by the Stage Trigger.
The Stage Trigger has two inputs: an Offset and a Time Unit.
A negative Offset starts the stage before the hire date
A positive Offset starts the stage after the hire date.
The Time Unit can be set in days, weeks, or months.
Check out the “Your first Day 🎉” stage below. It’s got a Stage Trigger of 0 Days. This means the new hire enters the stage on their hire date…

Now, an important note: Stages can’t overlap. A worker can only be “in” one stage at a time. If you try to configure overlapping stages, Workday will fire a hard error and prevent the plan from saving 🙅🏻♀️
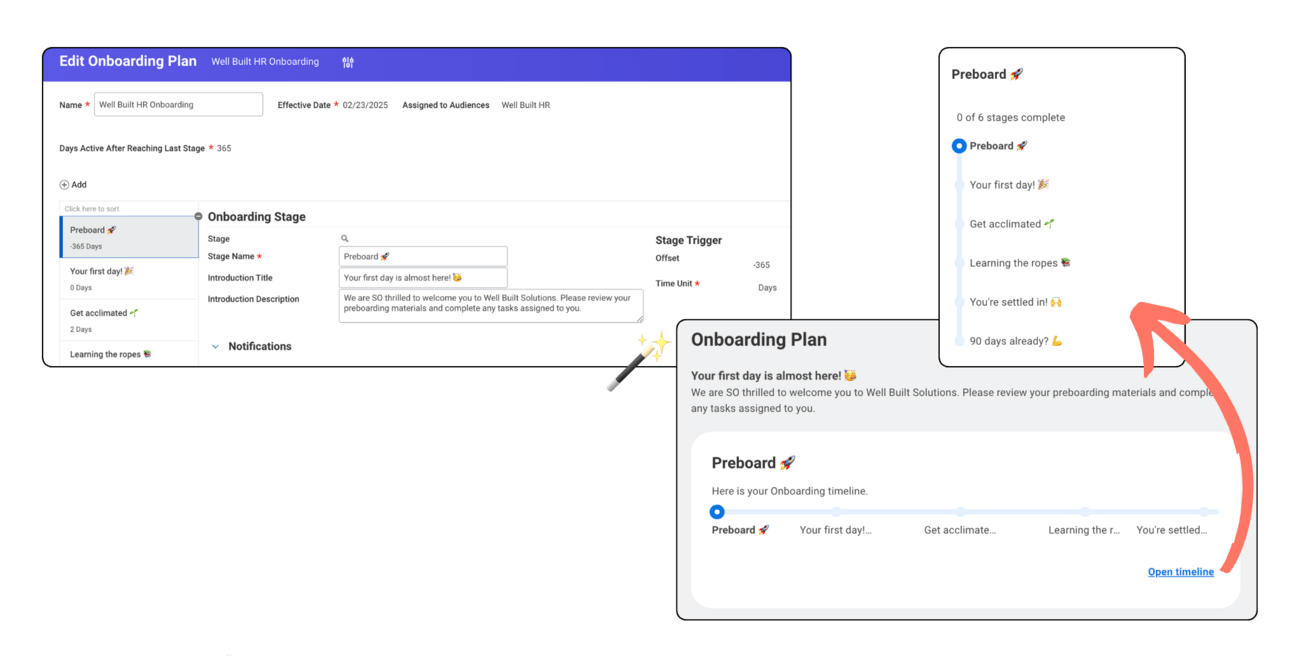
After you define the stages of your Onboarding Plan, it’s time to add in notifications and content to each stage. These components are what make Onboarding Plans such a massive upgrade 💫
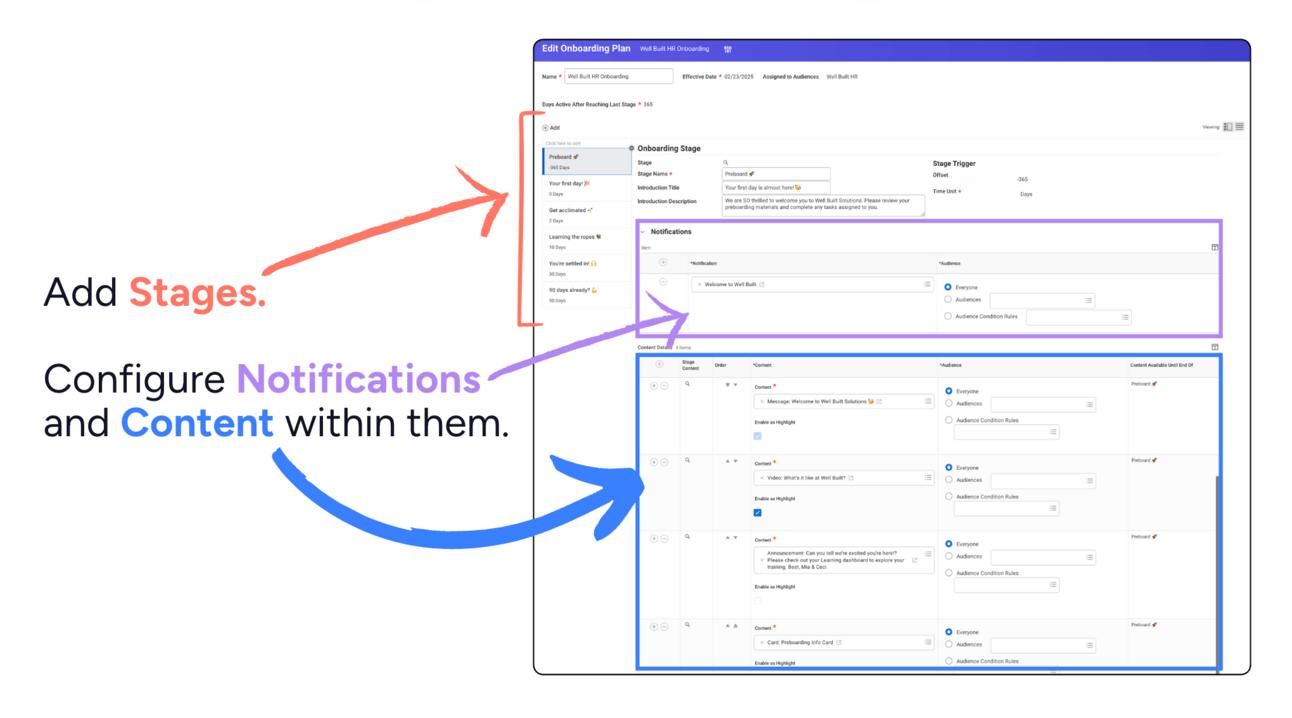
Here you can see the notification and content set up on the Preboard 🚀 stage of the Well Built HR Onboarding Plan.
Notifications
You can configure distinct notifications that fire when each stage is entered. You can also choose whether to send each notification to all assignees of the plan, to a specific audience, or to another population defined within an audience condition rule.
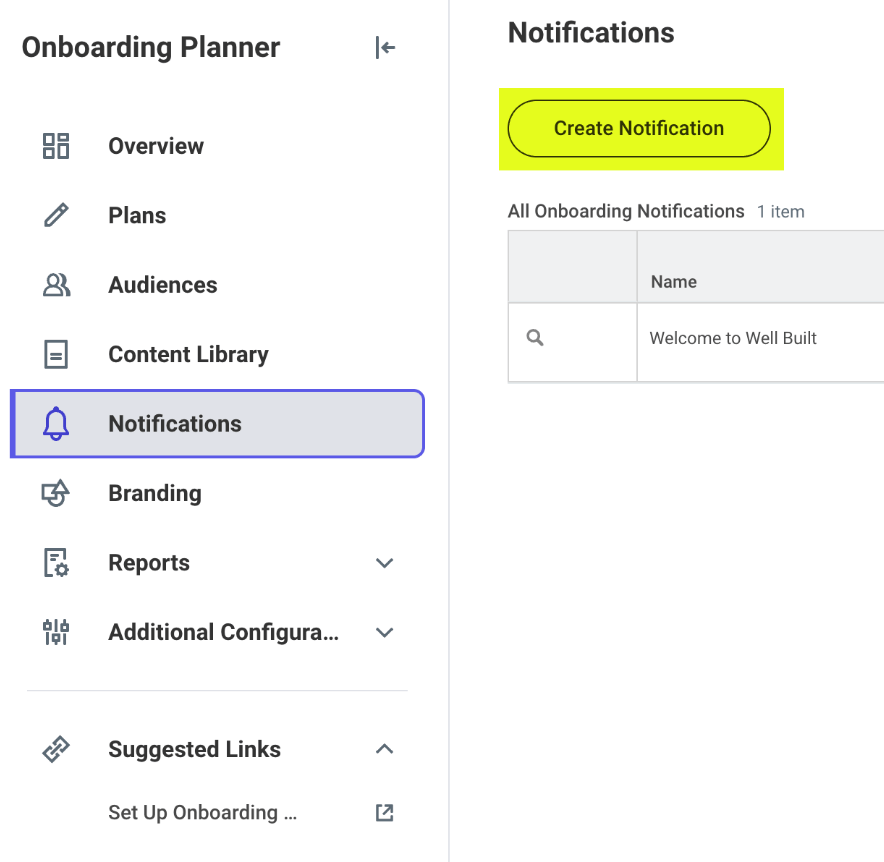
Set up your notifications directly on the stage, or from the Notifications panel within the Onboarding Planner Hub.
You can send notifications via email, and/or SMS texts (if you’ve purchased Workday Messaging). Texts are especially handy for your joiner populations who aren’t accustomed to signing into Workday yet. Or, those of you with a mobile-heavy workforce 📱
You can also…
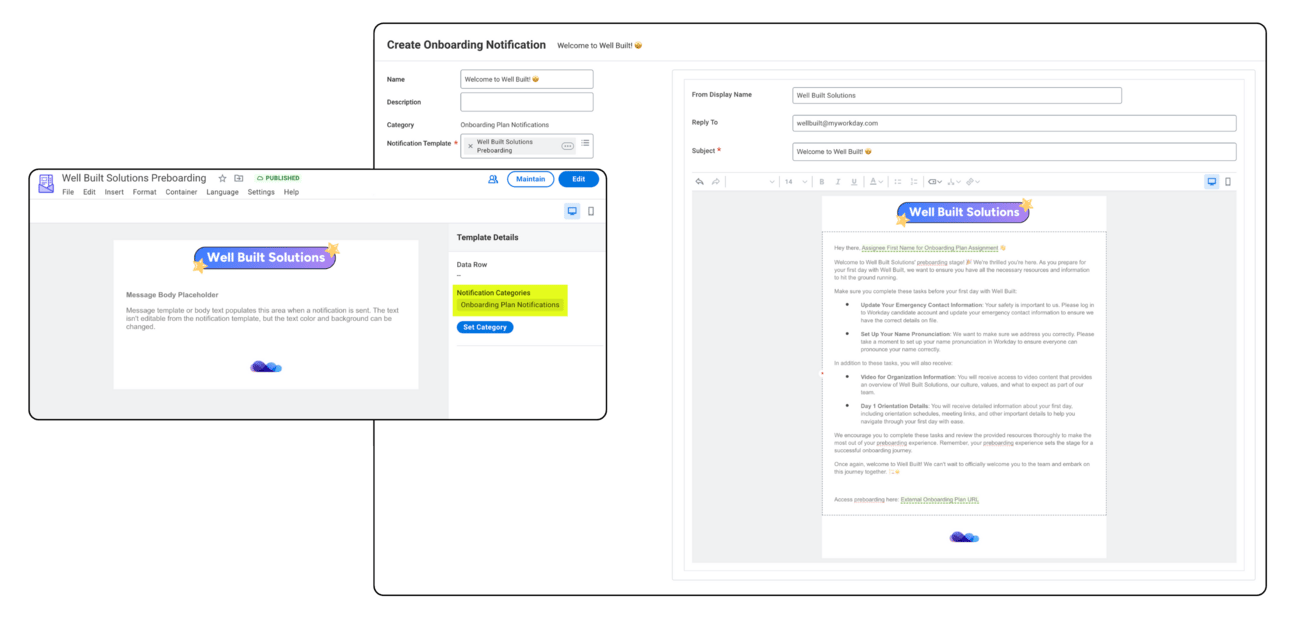
✅ Use Notification Templates from Workday’s Notification Designer.
✅ Add dynamic fields to automatically populate data like names, dates, links, and more.
Next up! The meat of Onboarding Plans 🥩
Content is what your joiner sees on their Onboarding Plan page, based on the stage they’re currently in.

Flashback to Donald Duck’s view of his Onboarding Plan! Every component you see there is considered Content with one exception: the To Do section. That area displays his current, in progress onboarding tasks defined on the Onboarding BP.
You can add an unlimited amount of content to each stage…

Create your content from the Content Library panel within your Onboarding Planner Hub, or directly on a stage.
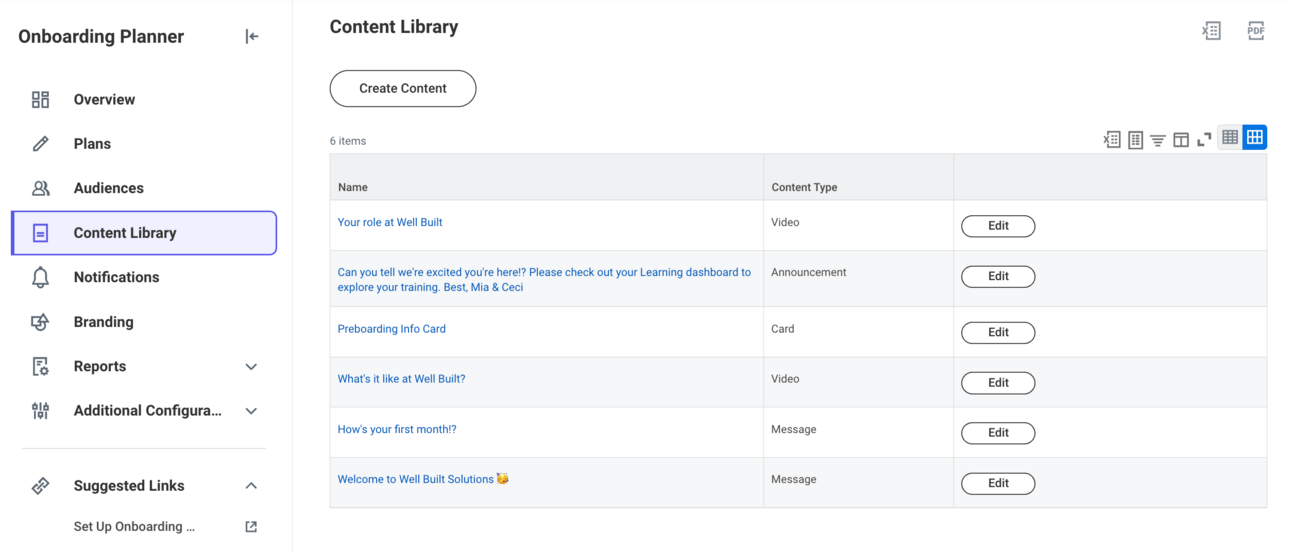
There are 4 different types of content you can configure:
Onboarding Messages
Onboarding Videos
Onboarding Cards
Onboarding Announcements
Messages are text-only inputs that appear as highlights on the Onboarding Plan. They’re a great way to establish culture and connect with your audiences. Use them to add a personal, human touch to your plans…
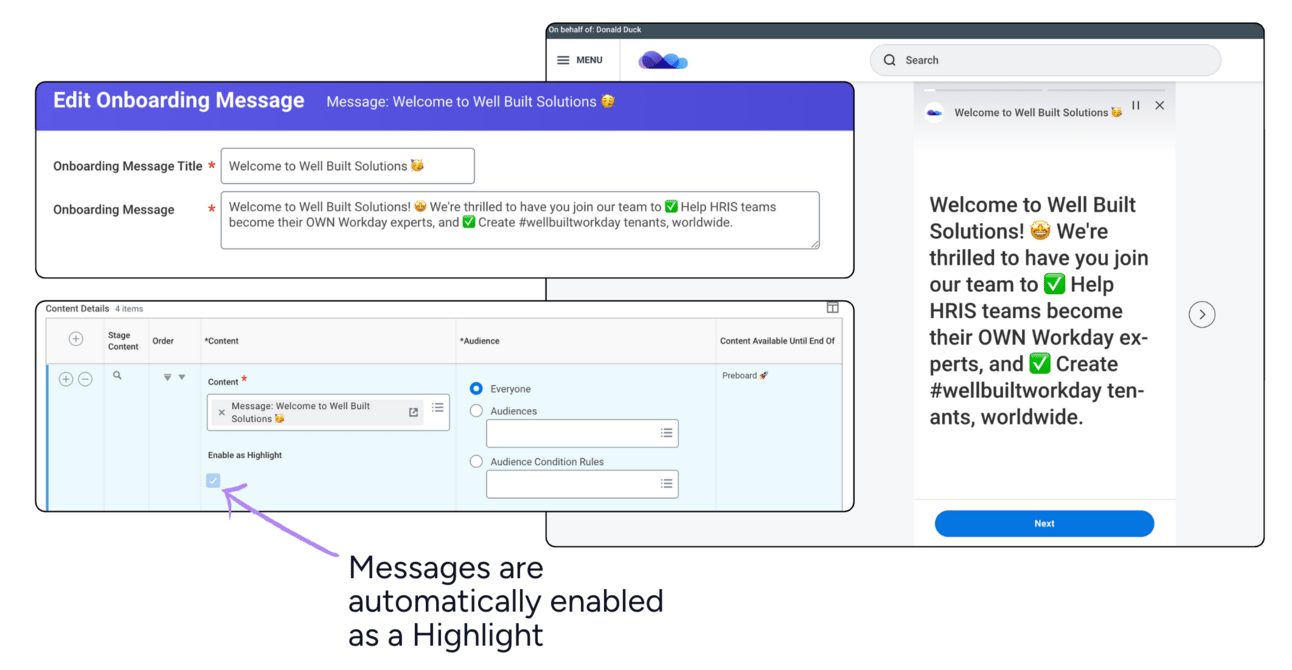
Videos can be added as highlights or in their own section below any assigned onboarding tasks. They’re a powerful medium for communicating information, showcasing leadership, or bringing your company culture to life. Maybe a welcome message from your CEO?

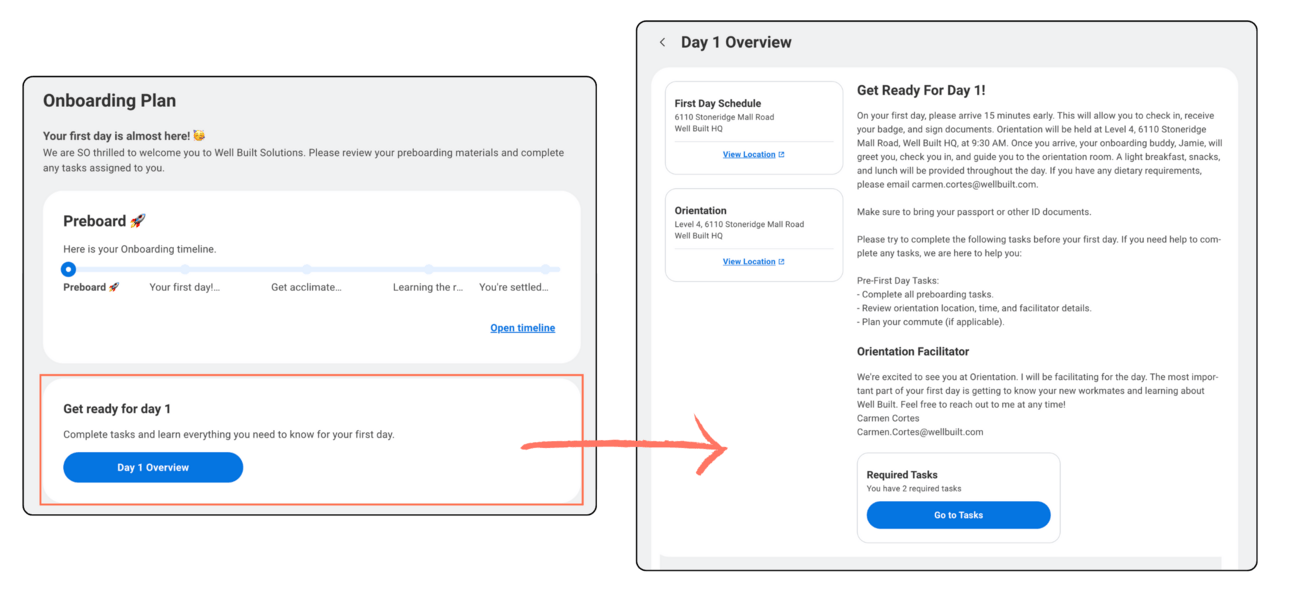
Cards are a single, configurable section used to display important information about a joiner’s first day—like logistics, instructions, or key contacts. You can configure one card per plan, and it can appear in just one stage. By default, Workday labels this the “Day 1 Card.”
Work location
First day start time
Orientation location
Orientation start time
Instruction overview
Orientation facilitator
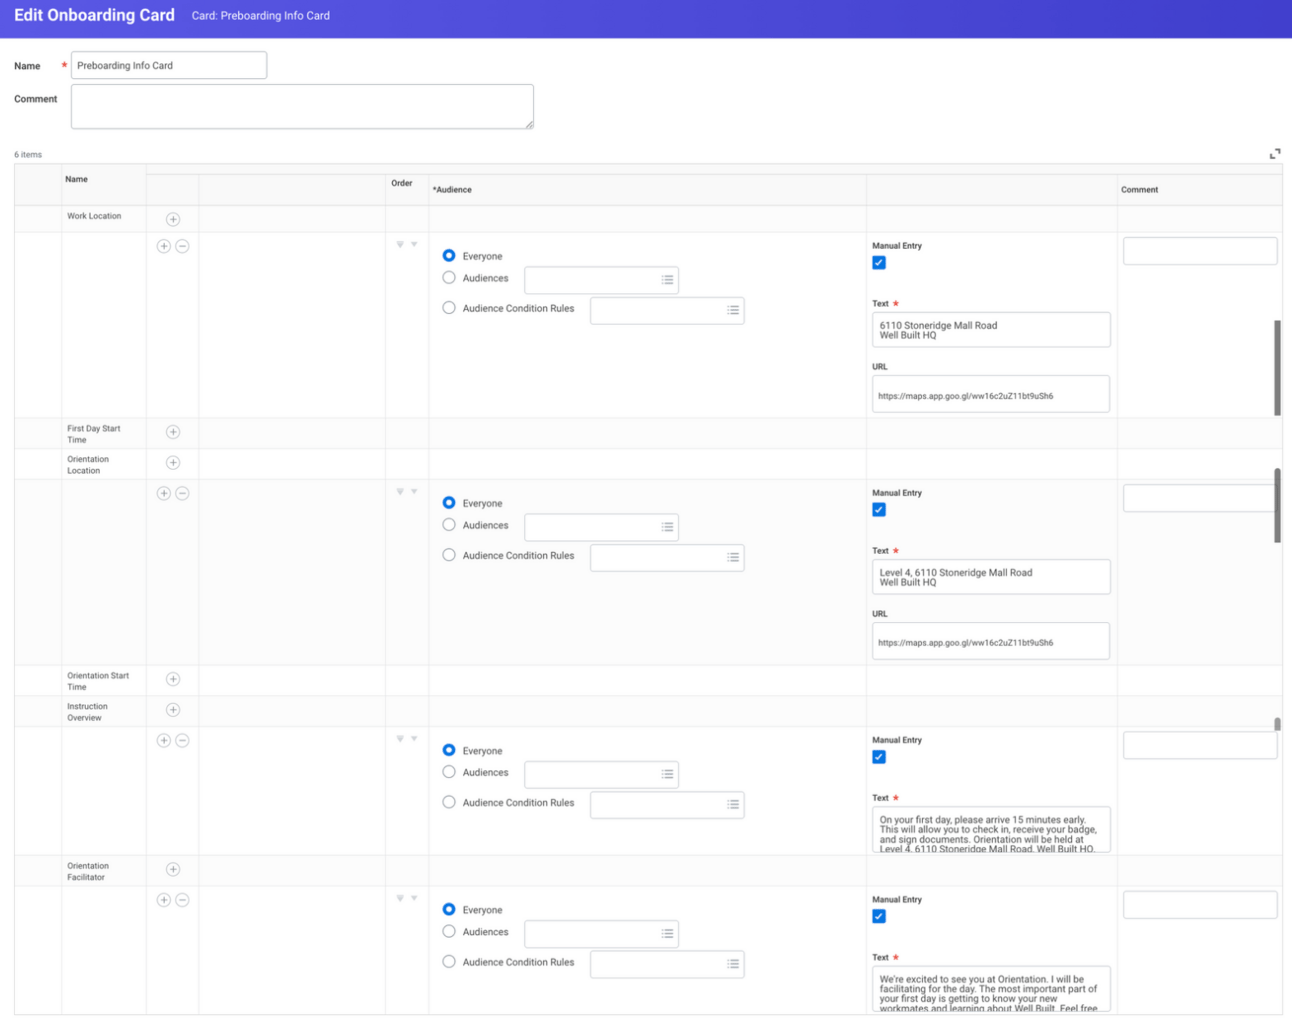
Here’s what a card looks like on a plan. It opens up to display a convenient, detail-packed view of key info…
And lastly, announcements! Similar to announcements elsewhere in Workday (like homepage announcements), you can use these to display messages, or link to tasks, reports, or external sites.
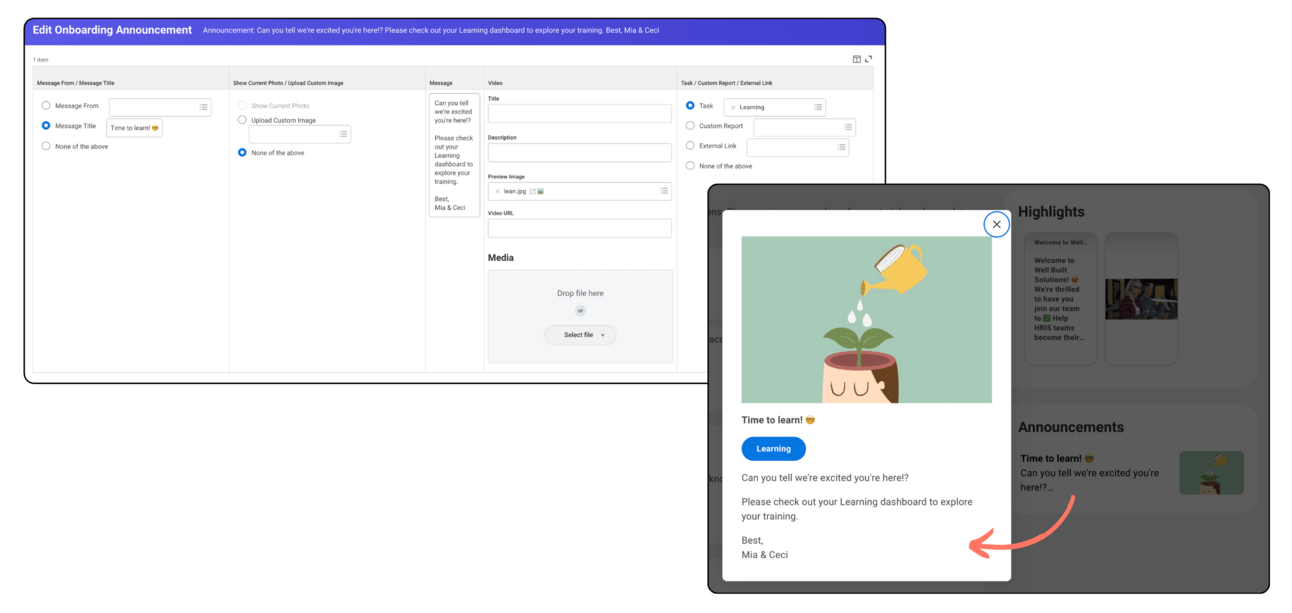
This example announcement is a task that sends the worker to Workday Learning 📚
In a future release, Workday plans to deliver the ability to post Learning content directly to an Onboarding Plan as well.
How an onboarding plan gets assigned…
⚠️ Important: Just because a pre-hire or new hire belongs to an Audience doesn’t mean they’re automatically assigned to an Onboarding Plan.
To ensure your Onboarding Plans are assigned…
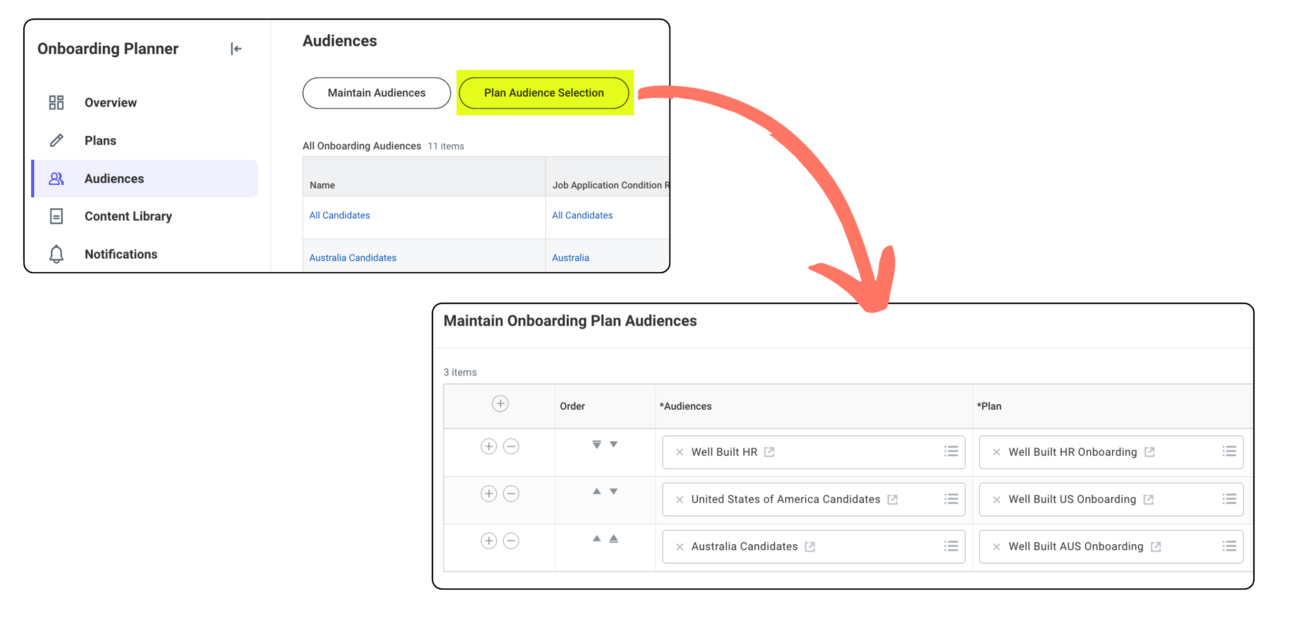
Verify your plans are connected to audiences using the task “Maintain Onboarding Plan Audiences” from the Audiences panel of the Hub. Like some other grids within Workday, order matters here! Order your plans with your most specific audience at the top.
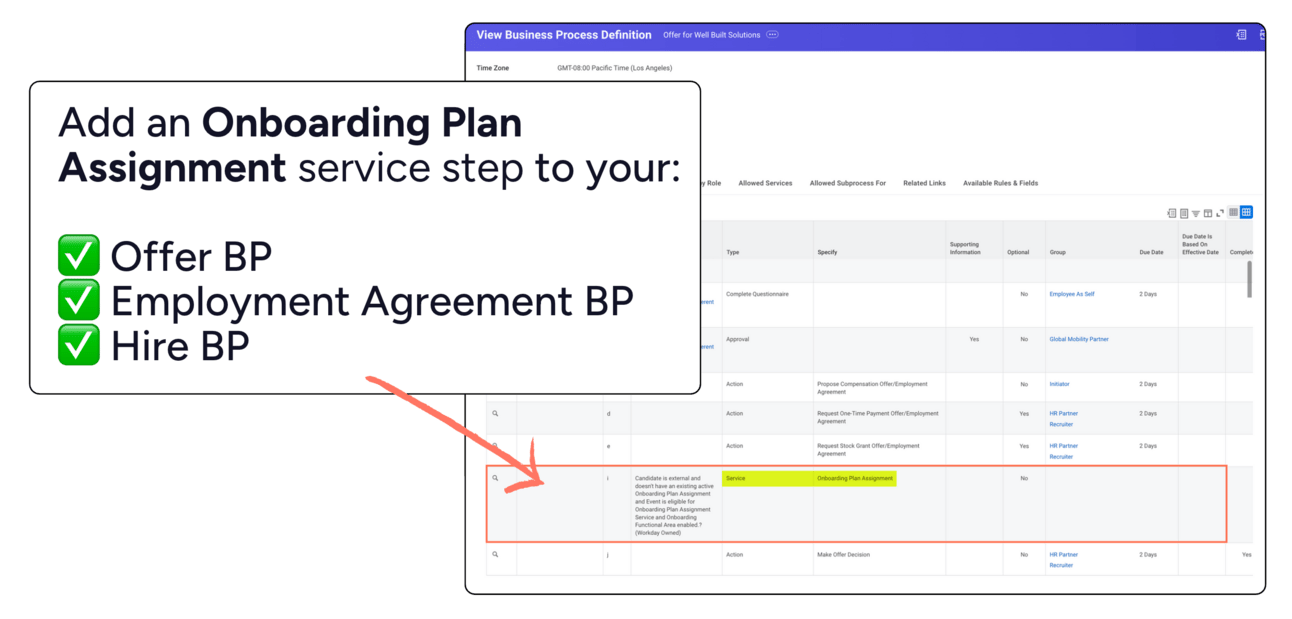
Add an Onboarding Plan Assignment step to your Offer BP, Employment Agreement BP, and/or Hire BP (you can add it on the Contract Contingent Worker BP as well if you’re setting up Onboarding Plans for your CW population too).
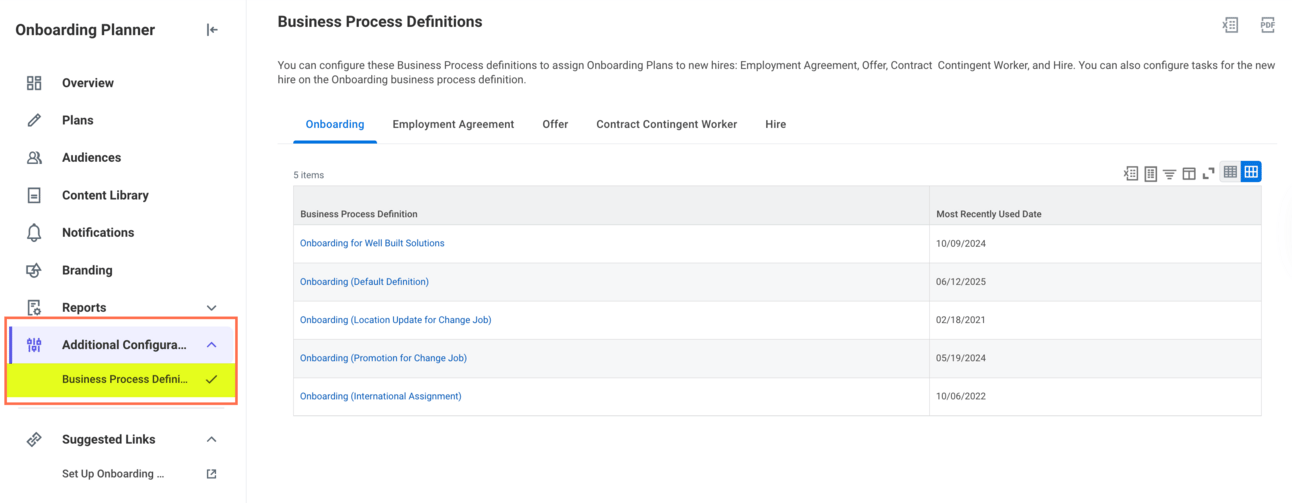
To help ensure you don’t forget critical step #2, you can find all of your Onboarding-related business processes within the Additional Configuration panel within your Onboarding Planner Hub:
If needed, there’s also a task “Assign Onboarding Plan” that you can use to assign a plan ad hoc.
Happy onboarding 🤗
Once a candidate accepts an offer, Onboarding is the first real experience they have with your organization. Seamless, thoughtful Onboarding instills confidence and loyalty in your new hire and sets the tone. Meanwhile, a disjointed, careless process can have them running for the door… before they even walk through it 😰
With Onboarding Plans, there are truly endless ways to create a stellar onboarding experience for your new people. So we hope today’s overview got your gears turning! ⚙️
As always, thank you for being a reader!
We’re celebrating you and your pursuit of a Well Built Workday 🥳
Until next time!
Ceci & Mia
Co-Founders of Well Built Solutions
Loving the newsletter? Leave us a testimonial here 🥰

Say hi 👋 on LinkedIn — @ceciblomberg, @miaeisenhandler
🤝 Want to partner with us? Get on Well Built’s project waitlist here.
Reply